

Cinched
By Norma Melton
We are honored to have our Cinched Cuff Tutorial featured in
Step by Step Wire Jewelry Magazine
Dec.-Jan. 2013 issue, page 24.
Thank you, Denise Peck, Editor in chief, for your recognition and enthusiasm!
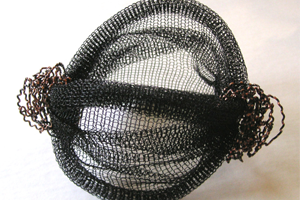
Make two cuffs with one 9-inch length of 3000 Series WireKnitZ®
Skill level: All levels
Materials
Makes two cuffs
1 – 9-inch 3000 Series WireKnitZ® (3012 Firebrick Red shown here)
6 – 10mm Pearls
6 – 5-inch 22 or 24 gauge wire
6 – 36-inch 22 or 24 gauge wire
Tools
Scissors
Ruler
Straight Pins
Wire Cutters
Round Nose Pliers
Chain Nose Pliers – optional
Wrist Mandrel – optional
View this Tutorial below or Download Printable PDF
Manipulating WireKnitZ®
1. To make two cuffs, fold 9-inch length WireKnitZ® in half and cut along fold revealing 2 – 4 ½-inch pieces.

2. To remove creases, slightly open WireKnitZ® tubes and gently massage the folded creases between your thumbs and fingers.

3. To make rolled cuff ends, fold cut ends over top ¼-inch. Continue to fold each end over four or five times until cuffs measure about 1-inch in width.

4. To set a rolled cuff end, place on wrist mandrel and stretch to about 2-inches in diameter. Flip bangle over on wrist mandrel to set other side. If setting without a wrist mandrel, evenly stretch both openings by hand.

5. To shape rolled cuff ends into a softly rolled edge, at one side of cuff, gently grasp WireKnitZ® under rolled edge between index finger and thumb, place other index finger and thumb adjacent on the same rolled edge and softly pinch while pulling gently in a circular motion, thus setting the roll in place. Repeat step 5 for other cuff edges.

6. Position one pearl at center point of 5-inch wire. Bend wires around pearl to meet snuggly against pearl and twist wires twice. Repeat with other pearls.

7. Find center point of 24 gauge 36-inch wires and softly bend in half to determine the center point.
8. Midway between rolled cuff ends, poke one end of 36-inch wire through underside of cuff. Poke other end of same wire two knit rows over and twist wires together one time against outside face of cuff. Wires are projecting in opposite directions. Wrap one wire around one outside rolled cuff edge and poke through center point of knit, cinching roll snuggly. Wrap other wire around the opposite rolled cuff edge, tightly cinching roll and snuggly twisting wires together one time on outside of cuff creating a structure to attach Pearl.

9. Attach pearl by straddling pearl wires around 36-inch wire structure pulling wires through knit and seating pearl snuggly to wire structure. Twist pearl wires together one time on underside of cuff feeding wires around rolled cuff edges as in Step 8. Wrap pearls short wires around base of pearl and bury wire ends under wire wraps with pliers.

10. Securely wrap 36-inch wires around pearl making a bird’s nest-like bezel and bury wire ends under wire wraps with pliers.

11. From first pearl location, mark two other pearl locations with pins one third around perimeter of cuff. Repeat Steps 8, 9, and 10 on cuff at 1/3 intervals.
12. Stretch cuff on wrist mandrel to size, or stretch manually.

13. After pearls are in place, repeat Step 5 softly reinforcing the rolled edge.

Tips & Techniques…
To slide cuff over widest part of hand, slip finger under cuff and rotate around hand easing cuff on.

To adjust width of cuff and narrow opening, spread rolled edges apart by either pushing rolls open with finger and thumb, or gently pulling with fingers from opposite hands making sure not to crush softly rolled edges.
| |
 |
Reposition the rolled edges and flare knit as desired.

WireKnitZ® is the registered trademark of Visuals in Presentation, Inc. copyright 2010-2012
www.WireKnitZ.com
Comments are closed.